Selecting Data and Positioning the Cursor


Selecting data and positioning the cursor are the first steps in most editing processes. After you have selected data, you can cut, copy, paste, mix, add effects, and more.

The selection status bar in each data window shows the beginning, end, and length of a selection. If no selection has been made, the cursor position is displayed.
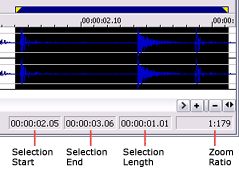
Sound Forge Pro selection Overview

  • Double-click the Selection Start box to type a value and move the cursor.

  • Double-click the Selection End or Selection Length box to type values in the boxes to specify or edit a selection.

  • Right-click to display the Status Format shortcut menu, which allows you to choose a time format.


What do you want to do?

Sound Forge Pro button OverviewSelect data using the mouse

Sound Forge Pro button OverviewSelect data using the Set Selection dialog

Sound Forge Pro button OverviewMark the start of a selection (mark in)

Sound Forge Pro button OverviewMark the end of a selection (mark out)

Sound Forge Pro button OverviewSelect data using the keyboard

Sound Forge Pro button OverviewQuantize to frames

Sound Forge Pro button OverviewEnable snapping

Sound Forge Pro button OverviewSet selection snapping

Sound Forge Pro button OverviewAdjust a selection’s length or position

Sound Forge Pro button OverviewView selection grid lines

Sound Forge Pro button OverviewToggling a selection

Sound Forge Pro button OverviewSelect all data

Sound Forge Pro button OverviewMove the cursor to a specific position

Sound Forge Pro button OverviewPosition the cursor using the Find command

Sound Forge Pro button OverviewCenter the cursor

Sound Forge Pro button OverviewAdjust a selection with the Loop Tuner

Overview